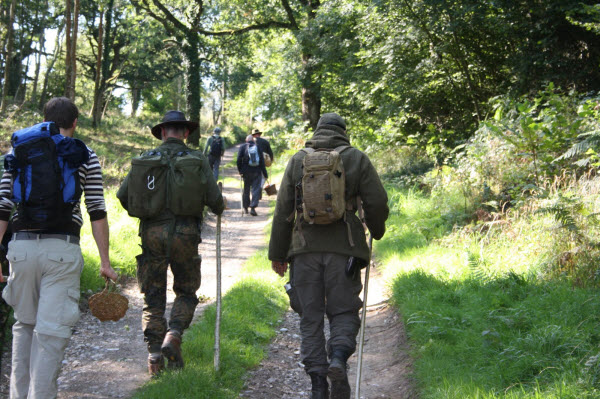
It is my firm belief that the forward thinking outdoors person should always strive to develop his or her knowledge and improvisational abilities before relying on a survival kit. However, as any boy scout worth his salt will tell you we should always be prepared when heading off the beaten track. Carrying an ‘off the shelf’ survival kit of some sort will tick that preparedness box and the classic survival tin comes up trumps as a very small, lightweight and unobtrusive option. However, the user must still have specialized training in order to use it effectively to improvise shelter, create warmth by lighting a fire, turn the little hooks and line into a fish supper and so on. As an emergency pocket kit in an environment where shelter building materials, water and fire wood are available the tin comes into it’s own but surrounded by natural resources, the properly prepared survivor should already feel confident that their knowledge, training and experience could compensate for many of the items in the tin (although a good knife and cooking pot would be handy…). For adventurous types planning to head out into the wilderness it makes a lot of sense to spend time contemplating what situation they’re most likely to have to survive in the first place! I base my survival kit around the conditions found in the wilder, more remote parts of the UK and similar environments, where one or more nights on an exposed hill side, possibly injured, possibly lost with limited available materials for fire lighting and shelter construction are potentially lethal and fairly commonplace. I also base it on some sound advice from Mors Kochanski, that the wise outdoors person should always carry enough equipment and clothing to sit out a storm or potential survival situation in relative comfort until rescued or can rescue themselves. Relative comfort! Those are two words most people wouldn’t expect to hear in conjunction with an article about survival kits! It’s a lot to ask from such a small package but the makings of a good kit should include…
-
Effective and immediate protection from the elements
-
A method of providing external warmth and/or maximizing body-heat retention
-
Equipment to call in rescue or alert potential rescuers
-
Equipment to gather and sterilize water
-
Equipment to repair kit or improvise using locally found materials
-
Direction finding equipment
-
Some basic first aid kit
-
An emergency ration
Now, this is an article I’ve written before a few years back but circumstances, knowledge and kit are always changing so the contents of my own survival kit have recently been updated slightly. The superb team at Alpkit sent me a few bits and bobs, some of which I already use as part of my standard kit and some which I hadn’t had the chance to use yet. You’ll see some of them listed here. As stated previously, my kit is based on reality and also ease of use. Rather than being something I squirrel away on the off chance I’ll fall out of a plane and land in the Amazonian jungle, my survival kit has many items in that are used more regularly. They are just arranged in a way that will (hopefully) ensure I have the most important bits with me when it matters. It’s a two stage system; stage one features a small but comprehensive bag of ‘bits and bobs’ easily plucked from my main rucksack and easily carried on my person in a situation where I might not want to carry my main pack or might not be able to (travelling cross country in a vehicle, crossing a river or mucking about in a canoe). It is designed to provide everything needed for survival in an unexpected situation on it’s own but also form the foundations of any outdoor kit list, no matter how big or small, providing a sensible bridge between the tiny pocket kit and a full complement of gear. Stage two is a ‘grab bag’ which is larger but allows for greater scope, even to the extent of it being a ‘grab and go’ lightweight daysack for micro adventures. It covers most emergency eventualities and even holds a few luxuries for day-to-day use. Both the ‘bits and bobs’ bag and the ‘grab bag’ can be carried at the top of a main pack (all your essential kit in one neat package) or as a standalone emergency/unexpected hike into the hills lightweight kit kept in the car. In the winter, I’ll often swap the Nalgene bottle for a stainless steel flask of hot chocolate and carry the grab bag as my lightweight running pack when heading off the beaten track. So, the stage one ‘bits and bobs’ bag…..
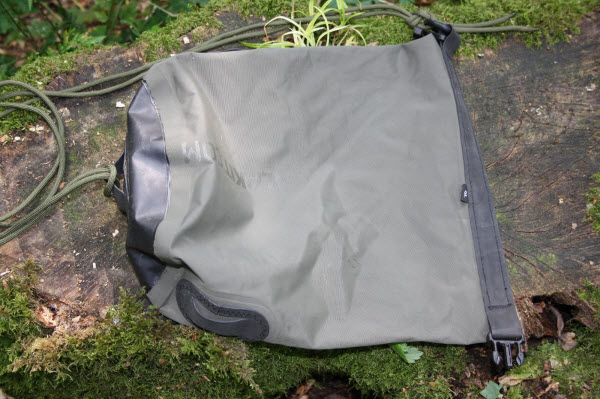
I use an Alpkit ‘airlok xtra’ 3 litre stuff sack. These are tough little roll top dry bags with well thought out fixing points for lashing them to your pack, mountain bike etc. They come with a handy webbing strap but I like to use 550 paracord, doubled over instead. This makes a fine ‘baldric’ style across the body carry strap but can also be taken off and used for spare boot laces, shelter building or any number of strong cordage related tasks (I once witnessed a couple of crazy Para’s abseiling out of a window on a doubled over length, although I strongly recommend you don’t do this…). The airlock range also come in red, which makes a first-rate first aid kit bag. Being fairly heavy-duty means that they float pretty well if accidentally dropped in the water (sealed obviously) but are also great as an emergency water carrier with just under 3 litres capacity! All the following items fit inside this bag…
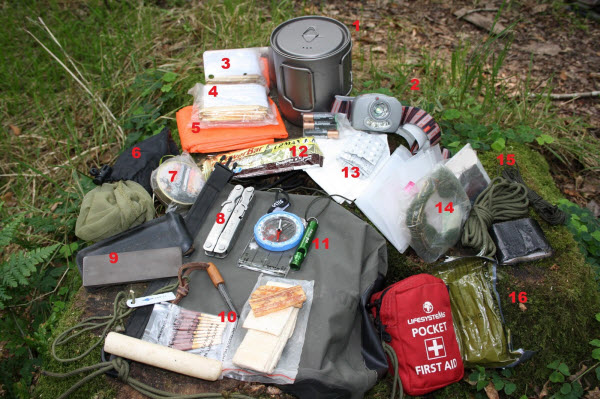
1. Alpkit ‘Mytimug’, a titanium mug complete with lid. A lot of the smaller items fit inside this incredibly lightweight but strong boiling vessel. A metal mug rates highly among my survival items – through personal experimentation I’ve found that it’s one of the few items you’ll struggle to improvise effectively from nature…but so important for sterilizing water and cooking food.
2. A good headtorch (this one’s an Alpkit ‘manta’) with spare batteries. Carry another in your main pack and treat this one as back up. When you’re out in the hills and your main torch batteries die, you’ll want to be able to do a straight swap for another good quality lighting system rather than fiddle about changing batteries in the cold darkness!
3. Heliograph signal mirror.
4. ‘Mylar’ reflective survival blanket. Extremely small and lightweight but will offer protection from the elements while maximizing retention of your radiated body heat too.
5. Lightweight orange plastic survival bag by BCB. Provides additional protection as a bivi bag, can be slit open and made into a shelter sheet or even weighted down with rocks as a highly visible marker panel for rescue aircraft.
6. Mesh, insect proof headnet. Additionally useful as a ‘shopping bag’ for foraged food, catching fish, melting snow, bank robbers disguise.
7. Small tin of highly effective insect repellent (this one is by Nordic Summer). This is one of those items that can’t really be classed as a survival item but you’ll be glad of it once you’re out in the woods.
8. A good quality multi tool. Several cutting options with a mini tool kit attached and the pliers are a real bonus too. Not meant to be a work horse but handy for light use or in an emergency.
9. Pocket sharpening system. Again, not essential for survival but it’s tiny, weighs virtually nothing and handy to have if you use sharp cutting tools a lot. This one is a Fallkniven DC4.
10. Fire lighting kit: Swedish ‘scout’ fire steel, lifeboat matches, some fat wood (highly resinous pine) and waxed tinder card. Fire steels give a huge shower of hot sparks, are virtually ever lasting, work even when wet and can be used in a gloved fist if dexterity is beginning to go in cold conditions. Can also be used to signal for a long way on a dark hill-side. I also pack a candle – will make a snow cave feel like ‘home’ and raise the temperature a couple of degrees too.
11. A small but proper Silva compass plus a good quality whistle for alerting rescuers. The internationally recognized distress signal is six whistle blasts in quick succession followed by a minute’s silence to listen for a response. Even after a response keep whistling until found!
12. Power bars as a high energy emergency ration.
13. Water purification tablets and a large transparent plastic bag. The bag can be used to collect rain water and as a transpiration bag for collecting evaporating water from non-poisonous foliage. I also include several paper coffee filters as a lightweight filtering system.
14. Trapping and fishing kit: Several brass wire rabbit snares (pre-dulled) and some strong line, small hooks and lead weights. It’s unlikely you’ll need to use these items but you never know…and they’re incredibly useful for making running repairs on your gear.
15. Repair kit: More 550 paracord, some incredibly thin but strong ‘comms’ cord and a small roll of gaffa tape. Gaffa tape mends waterproof clothing, holds kit together, straps up a twisted ankle. Nuff said! Assorted needles and strong thread are also included but more for clothing repairs than ‘Rambo’ style surgery…hopefully.
16. Very basic pocket first aid kit – purple Nitrile gloves (for dealing with other group members), a wound irrigation wash, tweezers and tick remover, assorted plasters, antiseptic wipes, steri strips, safety pins, asprin and a small field dressing for larger wounds. I’ve also included a small packet of ‘Celox’ a haemostatic clotting agent for serious bleeding.
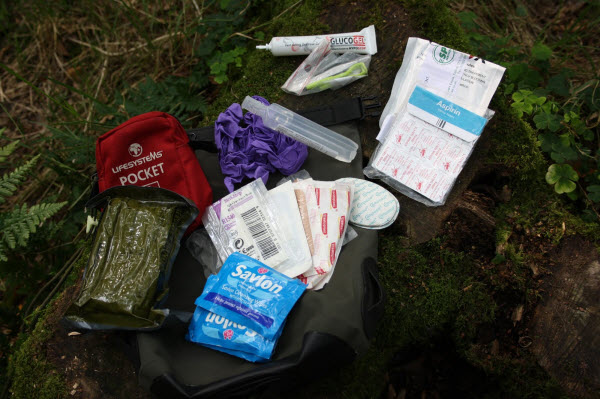
A small but perfectly formed first aid kit
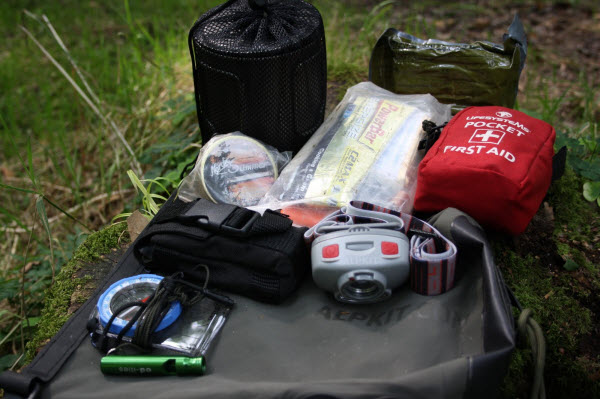
(above) The kit packed up ready to be stowed away. Key items that are most likely to be needed first are kept separate and near the top, easy to locate. The black cordura belt pouch holds the multi tool and sharpening stone. The unpacked kit as it is shown here could all be either worn as separate items on a belt or carried in the pockets of a jacket leaving the airlock bag to be used as a 3 litre water carrier.
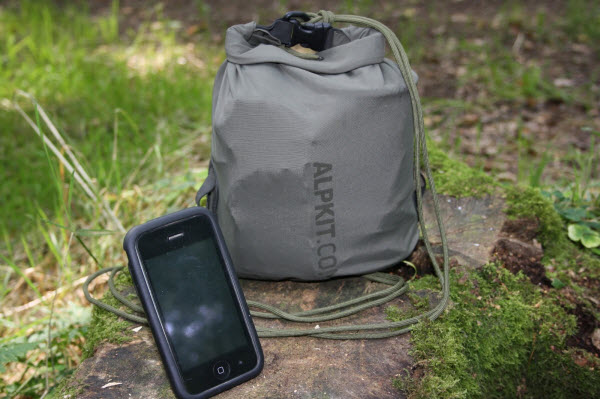
(above) The kit packed and ready for business, shown next to a mobile phone for scale. Love them or loathe them, you would have to be barmy in this day and age to head off into the wilderness without a fully charged mobile phone! Stage two, the grab bag: Many bushcraft or military style rucksacks feature removable side pouches with straps that can be used as a grab bag but I like to carry something made for the job. The excellent Alpkit ‘Gourdon’ dry bag day sacks are ideal. Lightweight, waterproof and fitted with comfy straps, mesh pockets and a shockcord stowage system – this is a LOT of daysack for the cash! I also like to carry it in the main compartment of my rucksack, near the top as I find this better for weight distribution, especially if my main pack isn’t loaded up for a long trip. The grab bag has my ‘bits and bobs, survival kit forming the foundations of the pack, which has most eventualities covered. With the addition of some very lightweight but completely useable items of kit, an unplanned night on the hill would only cause minor embarrassment rather than hypothermia.
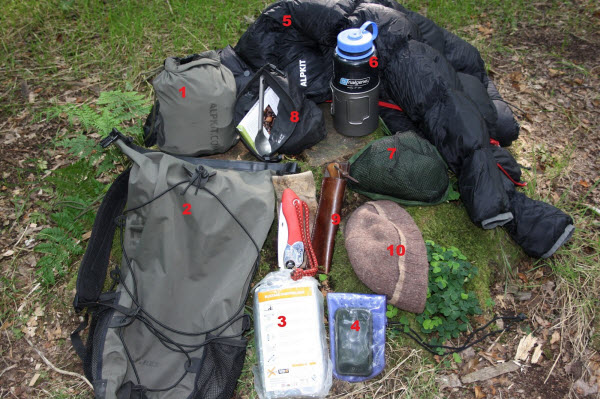
1. ‘Bits and bobs, survival kit.
2. Alpkit ‘Gourdon’ 20 litre waterproof day sack (they also do a 25 litre version and several other, brighter colours for outdoor folk who want to be seen). The back system is simple but even so, features a removable pad for using as insulation between your bum and the cold ground.
3.The fantastic ‘Blizzard Bag’ a vacuum packed survival bag with a warmth rating of a medium weight sleeping bag!
4. Fully charged mobile phone in a waterproof pouch – I normally carry mine in one of the mesh pockets, tethered to the pack.
5. Extremely warm, hooded jacket. This one is the Alpkit Filo jacket with supreme goose down fill. It squashes down incredibly small and weighs next to nothing. I keep a thin merino wool hat and windproof fleece gloves in the pockets.
6. Nalgene bottle with additional Mytimug fitting snugly on the outside giving additional cookability or just a more readily accessible mug for brews.
7. A lightweight, breathable bivi bag for total weather protection out in the open. This one is (you guessed it..) the Alpkit ‘Hunka‘ which squashes down into it’s own mesh pocket (as shown). An alternative for forest environments might be a lightweight tarp such as the rig 7, or even a lightweight waterproof poncho with attached guy lines for more versatility.
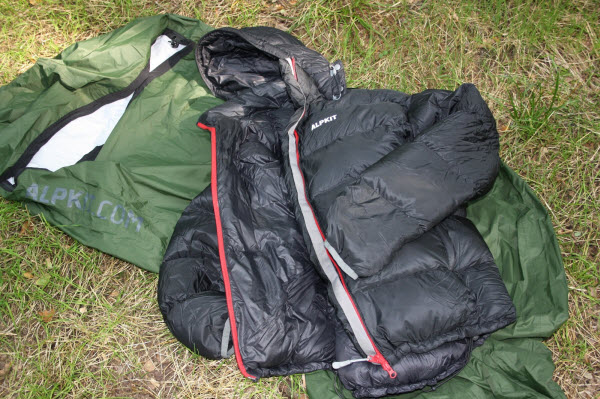
Alpkit ‘Hunka’ and ‘Filo’ jacket
8. Brew kit, high energy snacks, food for the day, spoon. I also carry a small pack of solid fuel tablets in here with a folding burner and flexible foil windshield for environments where lighting a fire might not be possible.
9. Belt knife and folding saw, for bushcraftin’.
10. Warm hat made from an old wool jumper! It doesn’t all have to be hi-tech…
The above list is assuming that a waterproof jacket is already being worn and a waterproofed map and user compass, carried. Both the waterproof jacket and map case could easily be lashed to the outside of the lightweight pack if needs be, by using the attached shockcord system and mesh pockets.
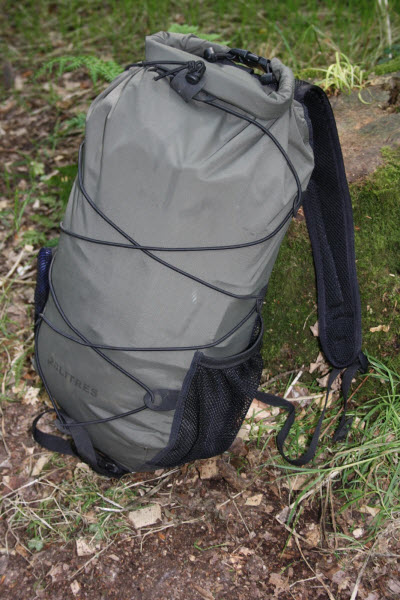
The grab bag packed and ready to go
Hopefully this article will be of use to you – I’m sure anyone who heads out into the wilds regularly will already have most, if not all of this kit. All I offer here are some tried and tested items of lightweight kit that I use and a packing system that ensures you have key, essential items with you when you need them. Happy wandering!
Joe’s book ‘The Wilderness Survival Guide’ is available on Amazon and other well-known book shops and fits nicely in your average Christmas stocking. Courses are also available in Wiltshire covering everything from foraging and fire lighting to making buckskin clothing and flint tools. Please visit www.wilderness-survival.co.uk
